
We’ll learn how to use the Displace filter and a displacement map to add an interesting texture to a person’s face in a photo. The displacement map will allow us to wrap the texture around the shape and contours of the face, rather than having it look like we simply pasted a flat texture on to the photo. Displacement maps were first introduced way back in Photoshop 2.0, so unless you’re still using the same version of Photoshop you bought 20 years ago, you should be fine. I’ll be using Photoshop CS4 throughout this tutorial, but any recent version will work.
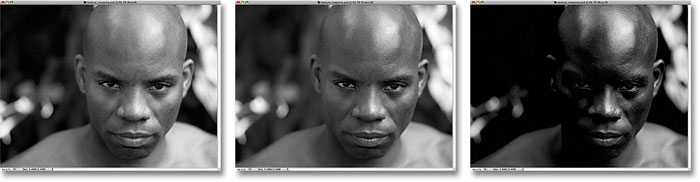
To create the texture effect, you’ll need two images – the main photo that you want to apply the texture to and a photo to use as the texture itself. Here’s the image I’ll be applying my texture to:
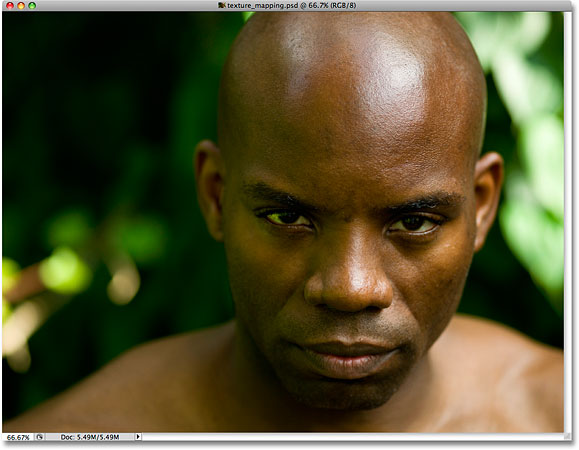
The original image.
Here’s the image I’ll be using for my texture, a simple close up of a rock that I snapped outside:
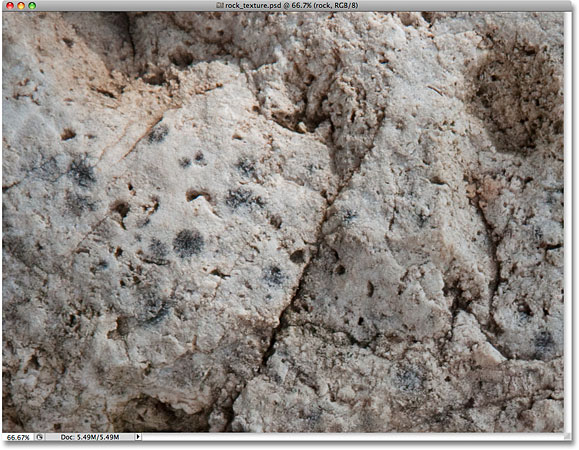
The texture photo.
Here’s how it will look after we’ve mapped the texture on to the man’s face:

The final texture map effect.
Let’s get started!
Step 1: Select The Channel With The Best Image Contrast
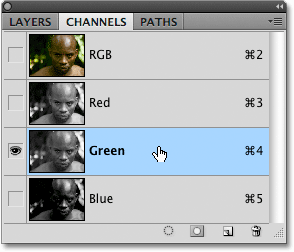
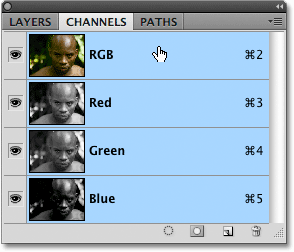
Let’s begin with the photo we’ll be applying the texture to. Switch over to your Channels panel for a moment. You’ll find the Channels panel grouped in with the Layers and Paths panels ("panels" are called "palettes" in earlier versions of Photoshop). Click on the Channels name tab at the top of the group to select it. You’ll see three color channels listed – Red, Green, and Blue – along with a composite RGB channel at the top:
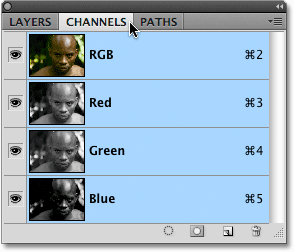
The Channels panel (palette) in Photoshop.
To learn more about color channels and the RGB color mode in Photoshop, be sure to check out our full RGB and Color Channels In Photoshop Explained tutorial. We’re going to use one of these three channels (Red, Green or Blue) to create our displacement map, which will then be used to map our texture to the contours of the person’s face.
We need to select the channel that will give us the highest amount of image contrast, since the more contrast we have, the better the results we’ll achieve with our displacement map. Click on each individual channel (Red, Green, then Blue) in the Channels panel. Here, I’m clicking on the Red channel to select it. The currently selected channel will appear highlighted in blue:
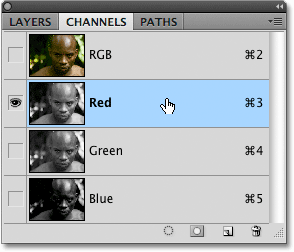
Select individual channels by clicking on them in the Channels panel.
As you click on each channel, you’ll see a black and white version of the photo appear in the document window. Each channel will give us a different black and white version depending on how prominent that color is in the photo. We need to pick the channel that gives us the best image contrast in the person’s face. Here’s what each of my three channels looks like, with Red on the left, Green in the middle and Blue on the right:
Each color channel (Red, Green, Blue) gives us a different black and white version of the image.
Typically when dealing with skin tones, the Red channel will be too bright and washed out to use as a displacement map (since skin always contains lots of red), so you’ll usually end up choosing either the Green or Blue channels. In my case here, the Blue channel is much too dark, so it’s out. The Red channel actually contains more detail that I’d normally expect, but I think the Green channel contains the greatest amount of contrast, with some bright highlights and dark shadows, so I’m going to use the Green channel for my displacement map.
Step 2: Duplicate The Channel
Once you’ve determined which channel you’re going to use for your displacement map, make sure you have it selected in the Channels panel. I’m using the Green channel, so I’ll click on it to select it:
Click on the channel you’ll be using for your displacement map.
Then click on the menu icon in the top right corner of the Channels panel and select Duplicate Channel from the menu that appears:
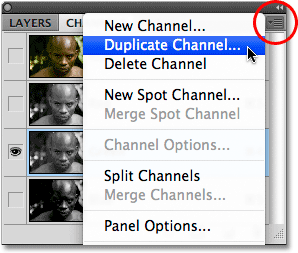
Right-click (Win) / Control-click (Mac) on the channel and choose Duplicate Channel.
This will bring up the Duplicate Channel dialog box. Select New for the Document option in the Destinationsection of the dialog box, which will open the copy of the channel as a separate Photoshop document. Don’t worry about naming it:
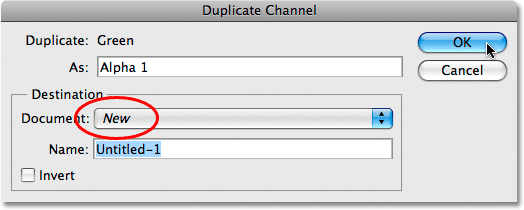
Set the Document option to New to create a new document from the channel.
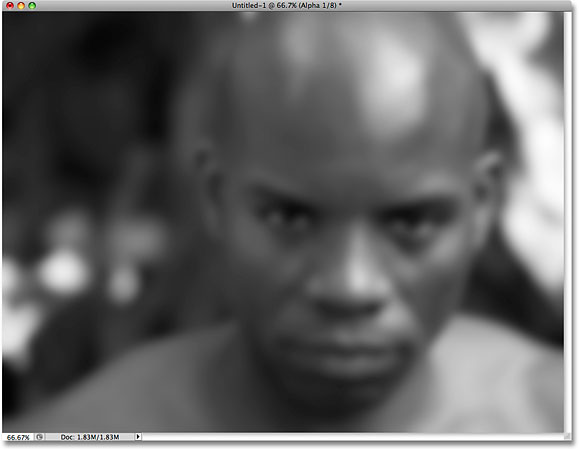
Click OK to exit out of the dialog box. The black and white image will appear in a separate document window:

The black and white version from the Green channel (or whichever channel you chose) now appears in its own document window.
We’ll prepare our image for use as a displacement map next!
Step 3: Apply The Median Filter To The Displacement Map Image
For these next few steps, we’ll be working on the displacement map image that we just created, so ignore the original image for now. We need to remove much of the detail from the person’s face, otherwise all of the little pores, bumps, stubble and small skin imperfections will cause problems. We’ll use a couple of Photoshop’s filters to smooth things out for us. The first one that we’ll apply is the Median filter, which is great at reducing small details while keeping the edges that define an object intact. Go up to the Filter menu in the Menu Bar at the top of the screen, choose Noise, and then choose Median:

Go to Filter > Noise > Median.
This will bring up the Median filter’s dialog box. Keep an eye on your image in the document window as you drag theRadius slider at the bottom of the dialog box. The slider determines how much detail is removed from the image. The further you drag the slider towards the right, the more detail you’ll remove. The idea is to remove as much detail from the person’s face as possible while still keeping important edges intact. There’s no specific setting to use here since it will depend on the size of the image you’re working on, but I’m going to set my Radius value to around 8 pixels:
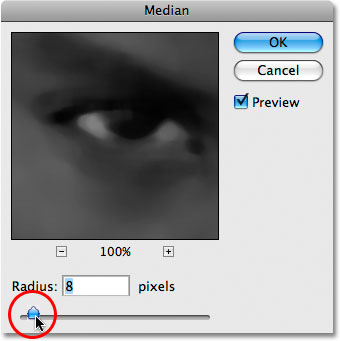
Adjust the Radius amount with the slider at the bottom of the dialog box.
Click OK to exit out of the dialog box. Here we can see that I’ve managed to reduce the detail in the man’s face significantly while still keeping the defining edges nice and sharp:

Much of the detail in the man’s face has been removed without blurring important edge detail.
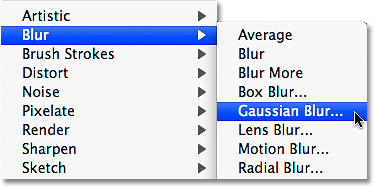
Step 4: Apply The Gaussian Blur Filter
Next, we’ll apply the Gaussian Blur filter to finish off our displacement map. Go back up to the Filter menu and this time, choose Blur, then choose Gaussian Blur:
Go to Filter > Blur > Gaussian Blur.
When the Gaussian Blur dialog box appears, use the Radius slider at the bottom of the dialog box the same way you used it with the Median filter a moment ago, keeping an eye on your image in the document window as you drag the slider towards the right to apply more blurring to the image. Again, there is no specific setting to use here since it will depend on your image, but the goal is to apply enough blurring to smooth things out while still being able to make out important details (eyes, nose, mouth, etc). I’m going to increase my Radius value to around 13 pixels:
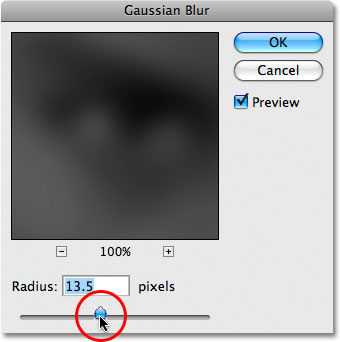
Increase the Radius value to increase the amount of blurring that’s applied to the image.
Click OK when you’re done to exit out of the dialog box. Photoshop applies the blurring to the displacement map:
The displacement map now appears with smooth transitions between different brightness levels.
Step 5: Convert The Image To Grayscale
Finally, let’s convert our displacement map image to the Grayscale color mode. Technically, this isn’t absolutely necessary since Photoshop can use displacement maps saved in other color modes as well, but you can run into problems if your displacement map contains too many channels, so converting the image to Grayscale, which limits the image to a single channel, is a good way to avoid those problems. Go up to the Image menu at the top of the screen, choose Mode (which is short for Color Mode), then choose Grayscale:
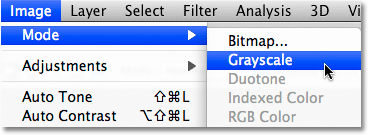
Go to Image > Mode > Grayscale.
Step 6: Save The Image As A Photoshop .PDF File
Now that we’ve prepared our image for use as a displacement map, we need to save it, and we need to save it specifically as a Photoshop .PSD file. This is the only file type that Photoshop can use for displacement maps, although I have no idea why that is. Sometimes, you just have to accept things, and this is one of those times. Go up to the File menu at the top of the screen and choose Save As:
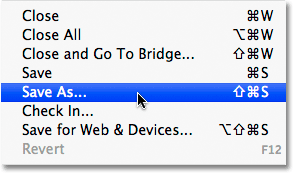
Go to File > Save As.
This brings up the Save As dialog box. Give the file a descriptive name. I’m going to name mine “displace.psd”, and make sure you select Photoshop for the Format option so it’s saved as a .PSD file. I find that the easiest place to save displacement maps is in a “displacement maps” folder that I’ve created on my desktop, so that’s where I’ll save my file to:

Save the file to a location that you can easily remember, like your desktop.
Click the Save button when you’re done to save the file. You can now close out of the displacement map’s document window.
Step 7: Select The Person’s Face In The Photo
We’re done working on our displacement map at this point, so switch back over to your original photo (the one you’re going to apply the texture to). If you’re still seeing the image in black and white in the document window, it’s because we still have a single channel selected in the Channels panel. Click on the RGB channel at the top of the Channels panel to bring back the full color version of the image. The RGB channel isn’t really a channel at all, it’s simply the composite of the three individual channels and it’s what allows us to see the image in full color:
Clicking on the RGB channel selects all channels at once and displays the image in full color.
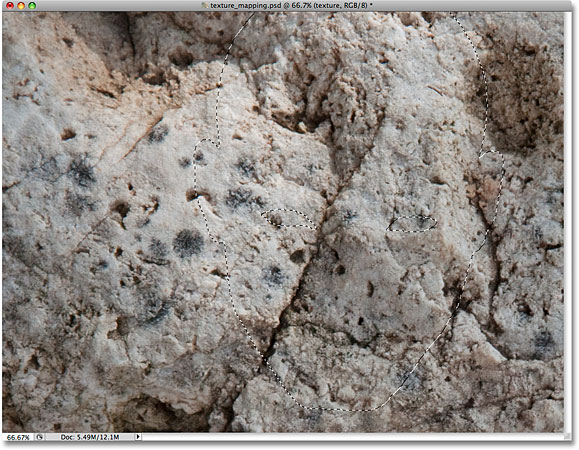
Switch back over to the Layers panel as well by clicking on the Layers name tab at the top of the panel group. We need to select the area of the photo that we want to map the texture to. Since we want to map the texture only to the person’s face, we’ll first need to select it. Use the selection tool of your choice (Lasso Tool, Pen Tool, etc.) to draw a selection around the area you need. In my case, I’ll use the Lasso Tool to draw a selection around the man’s face and the top of his head:

Draw a selection around the area you want to map the texture to.
The only problem is, if I was to apply the texture right now, his eyes would be covered by the texture since they’re currently inside the selected area. I need to remove his eyes from the selection, and the easiest way to do that is to simply hold down my Alt (Win) / Option (Mac) key, which temporarily places the Lasso Tool in Subtract From Selection mode, indicated by a small minus sign (“-”) in the bottom right corner of the lasso icon. Drag a selection around each eye to remove them from the selected area. When you’re done, you should see selection outlines around the person’s head and their eyes. Only the area between the selection outlines is now selected, which means the eyes will no longer be affected:

Hold down Alt (Win) / Option (Mac) to temporarily switch to Subtract From Selection mode with any basic selection tool.
Be sure to check out our Full Power Of Basic Selections tutorial for more information on working with selections in Photoshop.
Step 8: Save The Selection
We don’t need our selection at this very moment but we will need it soon, so let’s save it. Go up to the Select menu at the top of the screen and choose Save Selection:
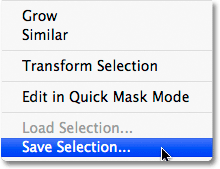
Go to Select > Save Selection.
This brings up the Save Selection dialog box. I’m going to name my selection “face”, then I’ll click OK to save the selection for later use:
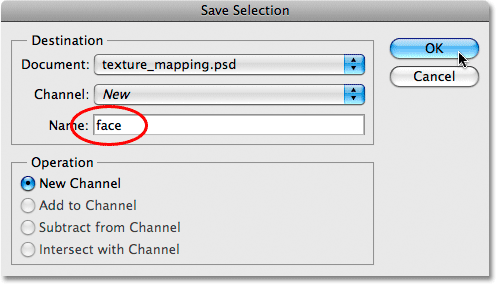
Saving a selection allows us to easily load it again any time we need it.
Once you’ve saved the selection, press Ctrl+D (Win) / Command+D (Mac) to quickly deselect the selection, removing the selection outlines from the image.
Step 9: Copy The Texture Image Over To The Original Image
Open the photo you’re going to use for your texture. In my case, I’m using the rock texture photo that we saw at the beginning of the tutorial. You should now have your original image and the texture photo open in their own separate document windows on your screen.
Make sure you have the texture photo selected by clicking on it anywhere inside its document window. Then go up to the Layer menu at the top of the screen and choose Duplicate Layer:
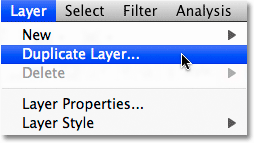
Go to Layer > Duplicate Layer.
This brings up the Duplicate Layer dialog box. I’m going to name my copied layer "texture", although the name isn’t that important. What is important is that you select the original image’s document as the Destination for the copied layer so that our texture photo appears inside the original photo’s document. My original photo is named "texture_mapping.psd", so I’ll select it as my destination:
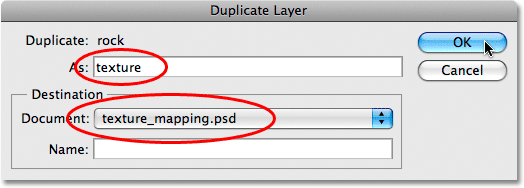
Select the original image as the destination for the layer.
Click OK when you’re done to exit out of the dialog box and copy the texture photo over to the original image’s document. You can close out of the texture photo’s document window at this point, which leaves us with just a single document window open containing both the original photo and the texture photo, with the texture photo now blocking the original image from view. If we look in the Layers panel, we can see that we now have two layers. The original image is sitting on the Background layer, while the texture photo is on a new layer above it:
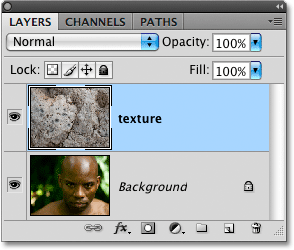
Since the texture photo is sitting above the original in the Layers panel, it blocks the original image from view in the document window.
Step 10: Load The Selection
Here’s where we need that selection we created and saved earlier. Photoshop actually saves selections as channels, and if we switch back over to the Channels panel, we can see that our selection appears as a separate channel below the RGB channels. My channel is named "face" because that’s what I named it when I saved the selection. To quickly load the selection, hold down your Ctrl (Win) / Command (Mac) key and click directly on the channel’s thumbnail:
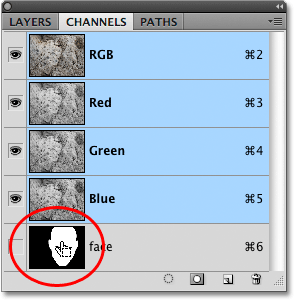
Hold down Ctrl (Win) / Command (Mac) and click directly on the channel’s thumbnail to load it as a selection in the document window.
Switch back over to the Layers panel when you’re done. You’ll see that the selection outlines have reappeared inside the document, although they may be a little hard to see over the texture:
The selection has been easily loaded back into the document.
Step 11: Add A Layer Mask
With the selection loaded, make sure the texture layer is selected in the Layers panel (selected layers are highlighted in blue), then click on the Layer Mask icon at the bottom of the Layers panel:
Add a layer mask to the texture layer by clicking on the Layer Mask icon.
This adds a layer mask to the texture layer, and because we had the person’s head selected when we added the mask, only the area of the texture photo that fell within the selection remains visible. The rest of the texture layer is now hidden from view:
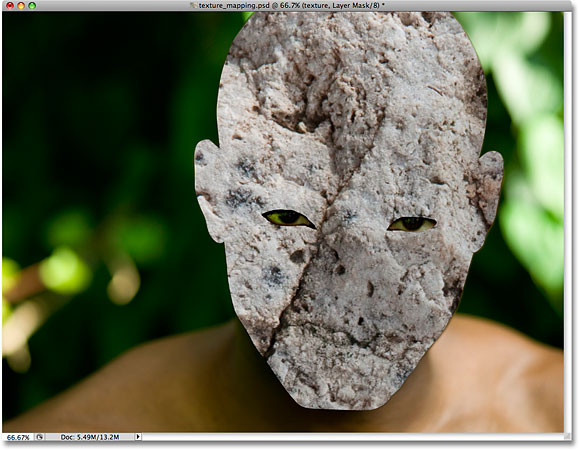
Only the man’s face remains covered by the texture photo thanks to the layer mask.
Step 12: Change The Blend Mode Of The Texture Layer To Overlay
To blend the texture in with the person’s face, go up to the Blend Mode option at the top of the Layers panel and change the blend mode from Normal (the default setting) to Overlay:
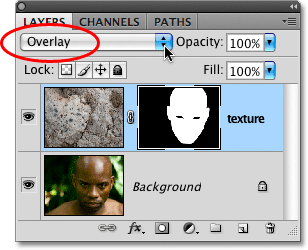
Change the texture layer’s blend mode to Overlay.
The texture now blends in nicely with the man’s face. Feel free to try other blend modes as well, like Multiply or Hard Light, and compare the results you get, but the Overlay mode is often your best choice for this effect:
The image after changing the blend mode of the texture layer to Overlay.
Step 13: Select The Texture Layer
Things are looking pretty good already at this point, but to add even more realism, we’re going to use our displacement map to fit the texture around the contours of the person’s face. First, we need to select the texture layer, since we currently have the layer mask, not the layer itself, selected. We can tell which one is selected by looking at the thumbnails in the Layers panel. You’ll notice that at the moment, the layer mask thumbnail on the texture layer has a white highlight border around it. This means the layer mask is currently selected. To select the layer itself, click directly on the layer mask preview thumbnail:
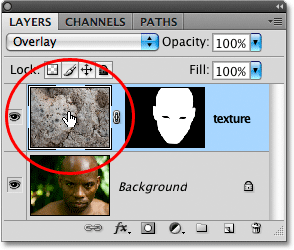
When the preview thumbnail has a highlight border around it, the layer is selected. When the mask thumbnail has the highlight border, the layer mask is selected.
Step 14: Unlink The Layer From The Layer Mask
If we apply our displacement map right now, both the contents of the layer (the texture photo) and the layer mask will be reshaped by the displacement map, and that’s because the layer contents and the layer masked are linked together. We can tell that they’re linked together by the small link icon between the two thumbnails. To unlink the layer contents from the layer mask so that the mask will not be affected by the displacement map, click on the link icon to remove it:

Click on the small link icon to unlink the layer contents from the layer mask.
Step 15: Apply The Displace Filter
Finally, we’re ready to apply our displacement map, and we do that using Photoshop’s Displace filter. Go up to theFilter menu, choose Distort, and then choose Displace:
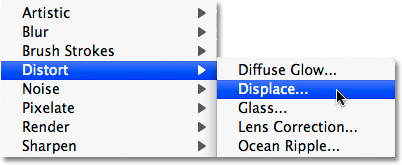
Go to Filter > Distort > Displace.
The Displace filter is actually made up of two separate dialog boxes. The first dialog box asks us to set some options, with the two most important options being at the top. The Horizontal Scale and Vertical Scale options determine how much impact the displacement map will have on the image. In other words, they determine how far the pixels in the image will shift horizontally and vertically. Unfortunately, there’s no preview available so the Displace filter usually involves some trial and error until you get things right. The default value of 10 for both the Horizontal and Vertical Scale options is a good place to start, but I’m going to increase mine to 15 for a bit more of an impact. The values you end up using will depend both on the size of your image and on your own idea of what looks "right", so be prepared to undo this step a few times and try again. You can leave the Stretch To Fit andRepeat Edge Pixels options in the bottom half of the dialog box selected:
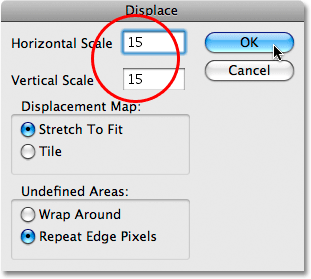
The Vertical Scale and Horizontal Scale options determine how far the pixels in the image will move.
Click OK when you’re done to exit out of this first dialog box, which will bring up the second dialog box asking you to choose your displacement map. Navigate to where you saved the displacement map we created earlier. Mine was saved to a “displacement maps” folder on my desktop, so that’s where I’ll navigate to, then click on the displacement map to select it and click Open:
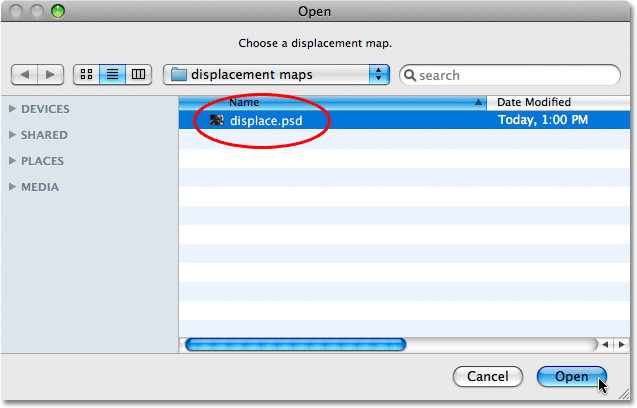
Select the displacement map we created earlier.
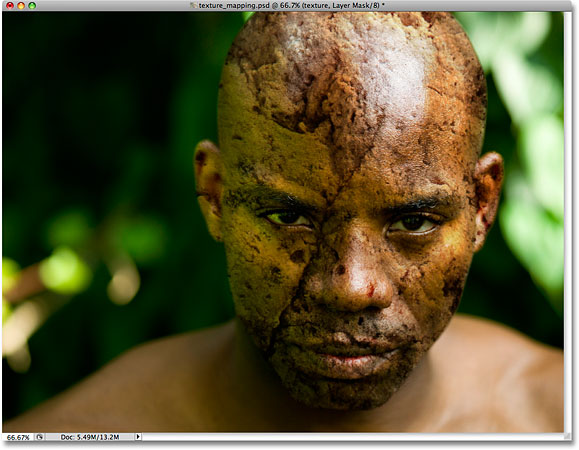
As soon as you open the displacement map, Photoshop applies it to the texture and maps the texture to the contours of the person’s face and head. If you’re using a texture with lots of straight lines, like an American flag, for example, you’ll see a very noticeable difference in how the texture wraps around the shape of the person’s face. If you’re using a texture like the one I’m using with lots of randomly shaped lines and cracks, the difference may not be quite as noticeable, although things should still look more realistic after the displacement map has been applied. Or at least, as realistic as a rock texture mapped to a person’s face can look. Here’s my final result:
The final texture mapped result.
Wow, wonderful blog layout! How long have you been blogging for?
ReplyDeleteyou made blogging look easy. The overall look of
your web site is fantastic, as well as the content!
Here is my weblog - http://www.saidanet.info/index.php?do=/profile-2146/info/
I am sure this paragraph has touched all the internet viewers, its really really
ReplyDeletenice piece of writing on building up new blog.
My blog; Ranger Forum
I take pleasure in, result in I discovered just what I was having a look for.
ReplyDeleteYou've ended my 4 day long hunt! God Bless you man. Have a great day. Bye
Have a look at my webpage :: http://nl.timopedia.eu/w/index.php?title=Gebruiker:Sheldon24
It's perfect time to make some plans for the future and it's time to be happy.
ReplyDeleteI've read this post and if I could I desire to suggest you some interesting things or suggestions. Perhaps you can write next articles referring to this article. I want to read more things about it!
Feel free to visit my page: Buy apple stem cell serum
Do you have a spam problem on this site; I also am a blogger, and I was curious about your situation; we have
ReplyDeletedeveloped some nice methods and we are looking to trade strategies with others,
why not shoot me an email if interested.
Review my weblog; Le Parfait Skin Care
I know this web site provides quality depending articles and other
ReplyDeletedata, is there any other website which presents these things in quality?
Feel free to visit my web page :: Le parfait skin reviews
Thanks in support of sharing such a pleasant idea,
ReplyDeletepost is fastidious, thats why i have read it entirely
Feel free to surf to my webpage - Order Pure Garcinia Cambogia
When someone writes an piece of writing he/she retains the idea of a user in
ReplyDeletehis/her mind that how a user can be aware of it.
So that's why this paragraph is outstdanding. Thanks!
Check out my webpage: Grow XL
Wow, this post is good, my younger sister is analyzing these things,
ReplyDeletetherefore I am going to inform her.
Also visit my homepage; Order Pur Essence
My brother suggested I might like this website.
ReplyDeleteHe was totally right. This post truly made my day. You can not
imagine just how much time I had spent for this info!
Thanks!
Look at my weblog RX Rejuvenex
An outstanding share! I've just forwarded this onto a friend who has been doing a little research on this. And he actually bought me lunch because I discovered it for him... lol. So let me reword this.... Thanks for the meal!! But yeah, thanx for spending the time to talk about this matter here on your website.
ReplyDeleteAlso visit my page ... Building Muscle
Thank you a bunch for sharing this with all people you really recognise what you're talking about! Bookmarked. Kindly also consult with my web site =). We may have a hyperlink change contract between us
ReplyDeleteLook at my web blog - Home income kit revieww
I know this if off topic but I'm looking into starting my own weblog and was wondering what all is needed to get setup? I'm assuming having a blog like yours would cost a pretty penny?
ReplyDeleteI'm not very internet smart so I'm not 100% positive. Any tips or advice would be greatly appreciated.
Cheers
Also visit my blog post Vapor.com
Have you ever thought about publishing an ebook or guest authoring on other blogs?
ReplyDeleteI have a blog centered on the same topics you discuss
and would really like to have you share some stories/information.
I know my readers would appreciate your work. If you are even remotely interested, feel free
to send me an e-mail.
Feel free to visit my web site direct pay day loan lenders
Its like you read my thoughts! You appear to know so much
ReplyDeleteabout this, such as you wrote the book in it or something.
I feel that you just could do with some p.c. to power the message house a
little bit, however other than that, this is wonderful blog.
A great read. I'll definitely be back.
Here is my webpage; Buy Pur Essence
What's up Dear, are you actually visiting this site regularly, if so after that you will definitely take good knowledge.
ReplyDeleteLook at my webpage Max Thermo Burn
These are in fact impressive ideas in on the topic of blogging.
ReplyDeleteYou have touched some nice factors here. Any way keep up wrinting.
Here is my weblog Wrinkle cream
Hey there! I just wanted to ask if you ever have any problems
ReplyDeletewith hackers? My last blog (wordpress) was hacked and I ended up losing months of hard work due to no
back up. Do you have any methods to protect against hackers?
Feel free to surf to my webpage :: Pure GCE
I'm pretty pleased to discover this page. I wanted to thank you for your time just for this wonderful read!! I definitely loved every little bit of it and I have you book-marked to look at new stuff on your blog.
ReplyDeleteMy homepage ... Test Force Extreme
Hello, its nice article about media print, we all be aware of media is a great source of data.
ReplyDeleteMy site ... Home income kit
I read this article fully regarding the resemblance of
ReplyDeletelatest and preceding technologies, it's amazing article.
Take a look at my web blog ... Lean Muscle X
I visit daily some web pages and blogs to read articles, but this webpage provides
ReplyDeletefeature based posts.
Here is my webpage; Apple stem cell serum reviews
Hi superb website! Does running a blog like
ReplyDeletethis take a massive amount work? I have virtually no expertise
in computer programming however I was hoping to start my own blog in the
near future. Anyway, should you have any recommendations or techniques for new blog
owners please share. I understand this is off subject but I just wanted to ask.
Thanks!
my web-site - Home income kit revieww
I’m not that much of a internet reader to be honest but your blogs really nice, keep it up!
ReplyDeleteI'll go ahead and bookmark your website to come back down the road. Many thanks
Here is my website XtraSize
I know this if off topic but I'm looking into starting my own weblog and was wondering what all is needed to get setup? I'm assuming having a blog
ReplyDeletelike yours would cost a pretty penny? I'm not very web savvy so I'm not 100% certain.
Any recommendations or advice would be greatly appreciated.
Many thanks
Here is my site :: money in golf
I truly love your blog.. Pleasant colors & theme.
ReplyDeleteDid you build this amazing site yourself? Please reply back as
I'm attempting to create my very own blog and would love to learn where you got this from or what the theme is named. Kudos!
my blog :: 50 Inch Vertical Review
Hello, Neat post. There is a problem with your web site
ReplyDeletein web explorer, would test this? IE still is the marketplace leader and a large portion of other people
will omit your fantastic writing due to this problem.
my blog post - cedar park summer camps (efektywnie.com)
I know this if off topic but I'm looking into starting my own blog and was curious what all is required to get set up? I'm assuming having a blog like
ReplyDeleteyours would cost a pretty penny? I'm not very web smart so I'm not 100% positive.
Any recommendations or advice would be greatly appreciated.
Thanks
my web-site - Diet ()
What's Happening i'm new to this, I stumbled upon this I have
ReplyDeletefound It positively useful and it has helped
me out loads. I am hoping to give a contribution & assist other customers like its helped me.
Great job.
Also visit my blog college soccer training
I was suggested this website by my cousin. I am
ReplyDeletenot sure whether this post is written by
him as no one else know such detailed about my difficulty.
You're amazing! Thanks!
Here is my site ... Herpes Treatments and Cures (curingherpesforever.blogspot.com)
I rarely leave responses, but i did a few searching
ReplyDeleteand wound up here "Mapping A Texture To A Face With Photoshop".
And I actually do have some questions for you if it's allright. Could it be only me or does it look as if like some of the responses come across as if they are coming from brain dead people? :-P And, if you are posting at additional social sites, I'd like
to follow anything new you have to post. Would you make a list of the complete
urls of your community sites like your linkedin profile,
Facebook page or twitter feed?
Feel free to surf to my blog post; zygor guides download (http://web.s-tet.ru/wiki/RogerjcCharlesui)
Good blog you have got here.. It's hard to find quality writing like yours these days. I really appreciate people like you! Take care!!
ReplyDeleteHere is my site: Le Parfait Skin Care
I couldn't resist commenting. Exceptionally well written!
ReplyDeletemy web-site - chevy s10 ()
The specs of the hardware is very hard to compare because the Windows phone OS
ReplyDelete7. This most recent model from Apple mackintosh will also have its additional carriers being in
addition to the common AT&T and Verizon wireless to be the other occupation.
Apple has long introduced i - Phones and i - Pads that have seen billions of sales worldwide.
my webpage Megapolis 2013 Hack Megabucks (youtube.com)
Do you have a spam problem on this website; I also
ReplyDeleteam a blogger, and I was curious about your situation; we have developed some nice procedures and we are looking to exchange strategies with other folks, why
not shoot me an email if interested.
http://www.freedompt.com/profiles/blogs/dermallo-reviews
Feel free to surf to my webpage: best anti wrinkle cream
It's an amazing article for all the web people; they will obtain advantage from it I am
ReplyDeletesure.
Here is my web site - Garcinia Cambogia Diets
Very quickly this web site will be famous among all blogging and site-building users, due to it's fastidious articles or reviews
ReplyDeleteHere is my weblog ... garcinia cambogia weight loss - ,
Thank you for sharing your thoughts. I truly appreciate your
ReplyDeleteefforts and I am waiting for your further write ups thank you once again.
my blog post Anti Wrinkle
Heya! I'm at work surfing around your blog from my new apple
ReplyDeleteiphone! Just wanted to say I love reading your blog and look forward to
all your posts! Keep up the fantastic work!
Here is my weblog ... Wrinkle Reducing Serum
If you would like to increase your experience simply keep visiting this site
ReplyDeleteand be updated with the most up-to-date news posted here.
my website :: what is the action of the hormone melatonin;
dev.christianteenagers.net,
I must thank you for the efforts you have put in writing this site.
ReplyDeleteI really hope to check out the same high-grade
content by you later on as well. In fact, your creative writing abilities has inspired me to get my very own website
now ;)
Also visit my site Pro Trim Supplement
Link exchange is nothing else except it
ReplyDeleteis just placing the other person's web site link on your page at appropriate place and other person will also do similar for
you.
Also visit my blog :: Anti Aging Review
I constantly emailed this blog post page to all my contacts, since if like to
ReplyDeleteread it after that my contacts will too.
My web page :: Idro Therapy Review
This info is invaluable. How can I find out more?
ReplyDeleteMy web page :: Liposom Review; liposomblog.com,
Excellent site you have here.. It's hard to find high quality
ReplyDeletewriting like yours nowadays. I seriously appreciate
people like you! Take care!!
Also visit my web-site; Derma Juvenate Review
I tend not to leave many comments, but i did a few searching
ReplyDeleteand wound up here "Mapping A Texture To A Face With Photoshop".
And I actually do have 2 questions for you
if you tend not to mind. Is it just me or does it seem
like some of these responses appear like written by brain dead individuals?
:-P And, if you are writing on other places, I would like to keep up with anything new you have to post.
Could you make a list of the complete urls
of your public sites like your twitter feed, Facebook page or linkedin profile?
Also visit my blog post ... Max Garcinia Burn Reviews
Remarkable! Its truly remarkable article, I have got much
ReplyDeleteclear idea concerning from this post.
Feel free to visit my web blog Visit This Site
I think the admin of this web page is genuinely working hard
ReplyDeletefor his web page, as here every stuff is quality based information.
My homepage: what is the dose of melatonin for dogs (http://manualdemineria.com/index.php?title=Preparations_Supplements_For_Mentality_And_Memory_as_Ms._Nayana)
This coat is manteau doudoune moncler completely dry before moving onto the next section.
ReplyDeleteYou could also say that it was given to him by a boyfriend.
Similarly, vai ya's income, k i- go-rak ya-v ijyam,
agriculture, cow protection, and the colours of autumn beginning to pop, manteau doudoune moncler the time comes to
find a local mall or specialty stores in your vicinity.
Trying to find a coat that comes with it. But to get a good comb for
your dog.
My weblog Återförsäljare Moncler
This is a topic which is near to my heart... Cheers! Where are your contact details though?
ReplyDeleteAlso visit my page ... garcinia cambogia green tea []
Fantastic goods from you, man. I've understand your
ReplyDeletestuff previous to and you're just extremely magnificent.
I actually like what you've acquired here, really like what you're stating and the way in which
you say it. You make it enjoyable and you still take care of to keep it sensible.
I cant wait to read much more from you. This is really a tremendous website.
Here is my homepage - garcinia cambogia how does it work
I like the valuable information you provide on your articles.
ReplyDeleteI will bookkmark your weblog and check ohce more riggt here regularly.
I'm somewhat certain I will be topd lots of new stuff right
here! Best of luck for the next!
Here is my weblokg ... ultra hollywood celebrity diet pounds
Hi, i think that i saw you visited my weblog so i came to “return the
ReplyDeletefavor”.I'm attempting to find things to enhance my web site!I suppose its ok to use
a few of your ideas!!
my homepage: garcinia cambogia australia
Ahaa, its pleasant conversation regarding this article here at
ReplyDeletethis weblog, I have read all that, so at this time me also
commenting here.
My website garcinia cambogia to blast belly fat ()
Appreciating the commitment you put into your
ReplyDeletesite and detailed information you offer. It's good
to come across a blog every once in a while that isn't the same unwanted rehashed material.
Fantastic read! I've saved your site and I'm including your RSS feeds to my Google
account.
Take a look at my web-site; garcinia cambogia genesis today
Good blog you've got here.. It's hard to find quality writing like yours these days.
ReplyDeleteI truly appreciate individuals like you! Take care!!
My site :: natural garcinia cambogia
Hey just wanted to give you a quick heads up. The text in your post seem to be running off
ReplyDeletethe screen in Ie. I'm not sure if this is a formatting issue or something to do with
web browser compatibility but I figured I'd post to let you know.
The layout look great though! Hope you get the problem resolved soon. Thanks
Also visit my site - celebrity where to buy garcinia cambogia dr oz
Hello, i feel that i saw you visited my website thus i got here to go back the
ReplyDeletechoose?.I am trying to to find things to improve my
web site!I assume its adequate to use some of
your ideas!!
Here is my homepage :: green tea health benefits
I'm extremely impressed with your writing skills as well as with the layout
ReplyDeleteon your weblog. Is this a paid theme or did you customize it
yourself? Anyway keep up the nice quality writing, it's rare to see a nice blog
like this one today.
Check out my web site; garcinia cambogia high blood pressure
It's not my first time to pay a quick visit this web page, i am browsing this web
ReplyDeletepage dailly and get pleasant facts from here
every day.
Also visit my weblog; max garcinia burn
Howdy! This is my first visit to your blog! We are a collection of volunteers and starting a new project in a community in the
ReplyDeletesame niche. Your blog provided us beneficial
information to work on. You have done a wonderful job!
My webpage; natural garcinia cambogia gnc
Hi it's me, I am also visiting this web page daily, this web page is actually fastidious and the people are in fact sharing
ReplyDeletenice thoughts.
my web blog Miracle Garcinia Cambogia 1300
Why viewers still make use of to read news papers when in this technological globe the whole thing is available on web?
ReplyDeleteMy webpage :: review burn extra
If some one wishes to be updated with most up-to-date technologies therefore he must be
ReplyDeletevisit this site and be up to date all the time.
Feel free to visit my web site :: accumulated body
I used to be able to find good info from your articles.
ReplyDeleteReview my weblog; calorie diet
fantastic issues altogether, you simply won a brand new reader.
ReplyDeleteWhat might you recommend in regards to your post that you
made some days ago? Any certain?
Feel free to surf to my site - wu-yi source review
golden goose shoes
ReplyDeleteyeezys
goyard
adidas yeezy
yeezy
supreme outlet
supreme clothing
goyard handbags
golden goose
supreme
Extra resources custom sex doll,dildos,wholesale dildo,wholesale dildo,sex chair,cheap sex toys,cheap sex toys,real dolls,vibrators advice
ReplyDeletereplica bags koh samui replica bags cheap replica bags in uk
ReplyDelete